I remember the exact moment I realized I had been doing my home cooling all wrong. It was a scorching summer afternoon, and my old, inefficient AC was struggling to keep up. Not only was my house still uncomfortably warm, but I also noticed my energy bills skyrocketing. That lightbulb moment made me dive deep into the world of trusted HVAC solutions, especially the art of proper mini-split and AC installation. If you’re tired of sweating through summer and freezing in winter despite your efforts, you’re in the right place.
Why Proper Installation Matters More Than You Think
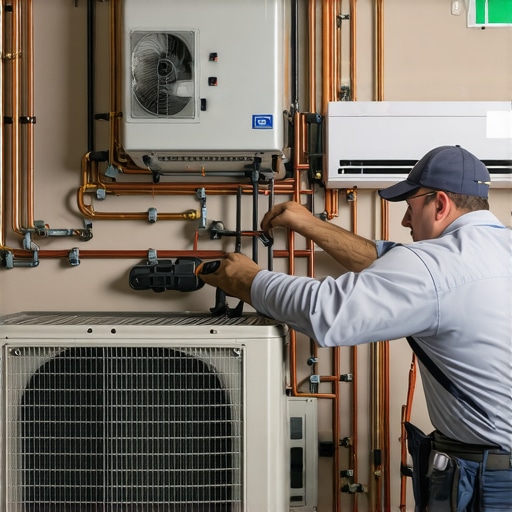
Most folks assume that buying a top-notch AC or mini-split is enough. Spoiler: it’s not. The real secret to lasting comfort lies in how these systems are installed. A poor setup can lead to uneven cooling, higher energy costs, and even system failures down the line. I learned this the hard way when my first mini-split installation resulted in constant issues—until I finally opted for expert guidance and a meticulous setup. It made me realize that trusting experienced professionals isn’t just smart; it’s essential for long-term savings and comfort. For a comprehensive breakdown, I recommend checking out this expert mini-split installation guide.
What Should You Expect from a Correct Installation?
From precise placement of the indoor and outdoor units to optimized refrigerant lines and secure electrical connections, every detail counts. Proper insulation and sealing prevent energy leaks, ensuring your system doesn’t work overtime. I once overlooked the importance of sealing around the indoor unit, which caused drafts and reduced efficiency. That mistake taught me that even small oversights can sabotage your comfort. Trust me, a well-executed install by trusted HVAC pros makes all the difference. Curious about the exact steps? You might want to explore this top AC installation tips.
So, have you faced issues with your current system? Are you considering a new setup but unsure where to start? Keep reading, because I’ll guide you step-by-step through proven strategies that guarantee lasting comfort and efficiency in your home.
Prepare Your Space Like a Pro
Before installing your mini-split or AC, clear the area around the units. Remove obstacles and ensure easy access for tools and technicians. I once tried to save time by skipping this step, only to find myself crawling on the floor during installation, which delayed the process. Proper prep streamlines the entire setup and reduces errors.
Choose the Right Location for Indoor Units
Position indoor units where airflow is unobstructed and away from direct sunlight or heat sources. Think of it as placing a fan where it can circulate air effectively, not just blowing against a wall. During my last install, I placed the unit near a window, which caused uneven cooling. Correct placement ensures consistent comfort and efficiency. For detailed placement strategies, visit this guide.
Optimize Outdoor Unit Placement
Position the outdoor condenser where it has plenty of airflow and minimal shade. Avoid tight spaces or areas prone to debris buildup. I learned this the hard way when mine was installed too close to a fence, restricting airflow and causing the system to work harder. Proper outdoor placement enhances system longevity and energy efficiency. For more tips, see top installation tips.
Seal and Insulate Thoroughly
Use high-quality sealants around indoor units and refrigerant lines to prevent energy leaks. Insulate refrigerant lines to maintain efficiency. I once overlooked sealing around the indoor unit, which led to drafts and reduced cooling performance. Proper sealing and insulation are like wearing a good coat in winter—essential for comfort and savings.
Ensure Precise Refrigerant Line Installation
Refrigerant lines should be installed without kinks or bends, which can restrict flow. Use proper connectors and ensure tight seals. I initially used makeshift connectors, causing leaks and system failures. Following proper line installation methods, as outlined in this guide, guarantees reliable cooling.
Electrical Connections Matter
Double-check wiring and use dedicated circuits to prevent overloads. Secure all electrical connections and test them before finalizing the install. During my last project, a loose wire caused intermittent system shutdowns. Paying attention to electrical detail ensures safety and consistent operation.
Test and Fine-Tune the System
After installation, run the system and check for leaks, unusual noises, or uneven cooling. Adjust settings and positions as needed. I once had to re-position an indoor unit slightly to improve airflow, which made a noticeable difference in comfort. Testing thoroughly saves headaches later and ensures your system performs at its best.
While many believe that choosing a high-quality mini-split or AC system guarantees optimal performance, the real game-changer lies in understanding the nuanced details of installation. Common myths, like the idea that any technician can handle the job or that placement doesn’t matter, can lead to long-term inefficiencies and costly repairs. Let’s dig deeper into what most people get wrong about HVAC installation and how to avoid these pitfalls to ensure your system performs reliably for years to come.
Why Even Small Installation Mistakes Can Derail Your Comfort
One of the biggest misconceptions is that installation is a straightforward process, but in reality, even minor oversights—such as improper refrigerant line routing or neglecting electrical safety standards—can significantly impact system longevity and efficiency. For example, kinks or bends in refrigerant lines restrict flow, causing the system to work harder and increasing energy bills. Additionally, improper sealing around indoor units can lead to drafts and uneven cooling, which many homeowners mistakenly accept as normal. These issues highlight the importance of adhering to detailed installation protocols outlined in trusted guides, like this expert mini-split installation guide.
Beware of the Oversimplification: Location is Everything
Another common myth is that indoor and outdoor units can be placed anywhere. In reality, optimal placement is critical. Indoor units should be positioned where airflow is unobstructed, away from heat sources, and not directly facing windows, which can skew thermostat readings. Outdoor units need ample airflow and should be protected from debris and excessive shading. A mistake I made was installing my outdoor unit too close to a fence, which reduced airflow and caused increased energy consumption. For advanced placement tips, check out this comprehensive guide.
How to Spot and Avoid the Most Common Installation Traps
Many homeowners are unaware of the importance of proper insulation and sealing around refrigerant lines and indoor units. Failing to do so can cause energy leaks and drafts, reducing system efficiency. Electrical wiring is another area where errors are frequent; loose or improper connections can lead to system shutdowns or safety hazards. The key is to work with certified professionals who follow established standards and protocols. Trust me, skimping on these details often results in costly repairs and frustration down the line. For expert advice on electrical safety and sealing, visit this trusted resource.
Have you ever fallen into this trap? Let me know in the comments. Remember, the devil is in the details, and a proper installation is your best defense against future headaches and expenses. By paying attention to these advanced nuances, you can ensure your HVAC system provides reliable comfort and energy savings for years to come.
How do I keep my HVAC system running smoothly over time?
Maintaining your HVAC system is crucial for ensuring reliable comfort and avoiding costly repairs. Over the years, I’ve tested and relied on specific tools and methods that make the upkeep process straightforward and effective. One essential tool I always keep in my toolkit is a high-quality digital multimeter. It allows me to quickly check electrical connections and ensure everything is functioning safely, preventing potential hazards or system shutdowns. I prefer a multimeter with auto-ranging capabilities because it saves me time and reduces error, making diagnostics faster and more accurate.
Another indispensable item is a refrigerant leak detector. Small leaks in refrigerant lines can significantly decrease efficiency and lead to system failure if left unchecked. I use an electronic leak detector that pinpoints leaks with precision, enabling me to address issues early before they escalate. Regularly inspecting refrigerant lines with this device helps maintain optimal cooling performance and extends system lifespan.
When it comes to cleaning and filters, I recommend investing in a set of compressed air cans and microfiber cloths. Compressed air is perfect for removing dust and debris from coils, fans, and vents without damaging delicate components. I also use a coil cleaning solution for deep cleaning, which I apply carefully following manufacturer instructions. Keeping coils clean improves heat exchange efficiency and reduces strain on your system.
For software and diagnostics, I rely on a professional-grade HVAC app that allows me to monitor system parameters remotely. These apps connect via Bluetooth or Wi-Fi to sensors installed in the system, providing real-time data on temperature, pressure, and energy consumption. This proactive approach helps catch potential issues early and plan maintenance routines effectively.
Looking ahead, I believe the trend in HVAC maintenance is moving toward smart diagnostics and automation. Future systems will likely incorporate AI-driven sensors that alert homeowners and technicians about problems before they become noticeable, minimizing downtime and repair costs. Staying updated with the latest tools and techniques ensures your system remains efficient and reliable for years to come.
What’s the best way to keep your HVAC system in top shape long-term?
Consistency is key. Schedule regular inspections with trusted professionals, such as those outlined in top HVAC maintenance tips. During these visits, ask your technician to perform a thorough check using the latest diagnostic tools. Additionally, replace filters every 1-3 months, depending on usage, and keep outdoor units free of debris. By combining the right tools with routine care, you’ll ensure your HVAC system operates efficiently and lasts for many years.
Try implementing a preventative maintenance checklist that includes inspecting electrical components, cleaning coils, checking refrigerant levels, and testing system controls. This proactive approach can save you money and stress in the long run. Ultimately, investing in quality tools and regular upkeep will pay off with consistent comfort and lower energy bills.
When I first installed my mini-split system, I underestimated the importance of precise setup. That mistake cost me months of uneven cooling and higher bills. Over time, I learned that the real secret to lasting comfort isn’t just choosing the right system but ensuring it’s installed correctly. The lessons I’ve gathered can save you from similar frustrations and help you enjoy year-round comfort with minimal hassle.
The Hardest Lesson I Learned About HVAC Installations
- Details matter more than I thought. A tiny oversight, like improper refrigerant line routing or insufficient sealing, can lead to significant efficiency losses and repairs down the line. Paying attention to every step in the installation process is essential for system longevity.
- Placement is everything. Indoor units should be positioned where airflow is unobstructed, and outdoor units need ample ventilation. I once installed my outdoor unit too close to a fence, which restricted airflow and caused the system to strain. Proper placement is the key to optimal performance.
- Working with experts pays off. DIY may seem tempting, but trusted HVAC professionals follow detailed protocols that ensure your system operates reliably. Their expertise prevents costly mistakes and guarantees your investment pays off over time.
My Essential Toolkit for HVAC Success
- Digital multimeter. I rely on a high-quality multimeter to quickly diagnose electrical issues and ensure wiring safety. It’s an invaluable tool that saves time and prevents hazards.
- Refrigerant leak detector. Small leaks can be sneaky. I use an electronic leak detector to find and fix leaks early, maintaining system efficiency and avoiding costly repairs.
- Coil cleaning supplies. Regular cleaning with microfiber cloths and coil cleaning solutions keeps heat exchange optimal. Clean coils mean less strain and better cooling.
- HVAC diagnostic app. Monitoring system parameters remotely helps me catch issues before they escalate, ensuring continuous comfort and efficiency.
Take Charge of Your HVAC Journey
Don’t wait for discomfort or expensive repairs to motivate you. Regular maintenance, proper installation, and the right tools are your best allies in ensuring reliable home cooling and heating. Stay proactive, trust experienced professionals, and keep learning. Your home’s comfort depends on it!
Reading this post really resonated with me because I once faced similar issues with uneven cooling after a DIY install. I learned the hard way how even small oversights in refrigerant line routing or sealing can impact system performance. Since then, I’ve always prioritized working with certified professionals and following detailed installation guides. It’s impressive how much difference proper placement and insulation can make—especially in older homes where air leaks are common. One thing I’ve found helpful is using a thermal leak detector to identify drafts around indoor units and refrigerant lines, which helps in sealing leakages efficiently.
Have others here experienced early signs of installation issues, like unusual noises or inconsistent cooling, before they caused major problems? I’m curious how different methods of troubleshooting and accurate placement have worked for others in maximizing efficiency and longevity. It seems that prevention and attention to detail are truly the best strategies for long-term comfort.
This post hits the mark on what I learned from my recent mini-split upgrade. I used to think that buying a high-quality system was enough; however, I underestimated the importance of professional installation and precise placement. After my system was installed without considering airflow and outdoor obstructions, I experienced inconsistent cooling and noise issues. Working with certified HVAC technicians and following detailed placement guides really made a difference in performance and efficiency. I also found that sealing and insulating refrigerant lines and units properly can save a lot on energy bills over time.
This post really hits home for me because I recently experienced the frustration of an inefficient cooling system that just wouldn’t cut it during the peak summer heat. After some research, I realized that even the best HVAC units can falter if not installed correctly. I learned that proper placement of indoor units in shaded, unobstructed spots, combined with correct outdoor unit positioning for airflow, made a noticeable difference in efficiency and comfort. I also started sealing refrigerant lines myself, using high-quality sealants, to improve system performance. It’s fascinating how small details—like line routing or sealing—can significantly impact long-term reliability and energy savings. Has anyone experimented with different setups for indoor placement, like near windows versus interior walls? I’d love to hear about your experiences with optimizing placement to maximize comfort and efficiency.
This post really underscores how crucial proper installation is—something I learned the hard way. When I first had my mini-split installed, I assumed the system would work perfectly without much oversight, but I soon noticed inconsistent cooling and higher energy bills. Once I had a qualified technician revisit the setup, including sealing refrigerant lines and ensuring proper placement, everything improved dramatically. It made me realize that even small mistakes, like improper sealing or not considering airflow, can drastically affect system performance. I’m curious, have others here found that the most effective way to prevent these issues is to educate yourself on the installation details before hiring a technician? Or do you think trusting professionals is enough? I’d love to hear different experiences on how to best ensure a long-lasting, efficient system that provides year-round comfort.