The Midnight Plip-Plip: A Forensic Diagnosis of the Mini-Split Leak
You’re laying in bed in the dead of August, the humidity is thick enough to chew, and you hear it—that rhythmic, metallic ‘plip-plip’ hitting your hardwood floors. It’s not a leaky faucet; it’s your high-efficiency 2026 mini-split sweating through its plastic casing like a marathon runner in a sauna. As a technician who has spent thirty years crawling through blown-in insulation and dragging manifold gauges across blistering tar roofs, I can tell you that a leaking indoor head unit is rarely a ‘broken’ machine. It is a physics problem. Most homeowners panic and call the big-box HVAC companies, only to be met by a ‘Sales Tech’—a guy in a crisp white shirt who wouldn’t know a manifold from a marshmallow but knows exactly how to read a commission chart.
“The most expensive equipment in the world cannot overcome a bad duct system—or in the case of a mini-split, a failure to respect the laws of condensate management.” – Industry Axiom
The Narrative Matrix: The Case of the $15,000 Dust Bunny
Last summer, I followed one of those ‘Sales Techs’ out to a job in the humid suburbs. He’d just quoted a retiree $15,000 for a full system replacement because her two-year-old mini-split was ‘leaking internal refrigerant’ and had ‘compromised coils.’ I walked in, saw the puddle on the floor, and grabbed my nut driver. I didn’t see a refrigerant leak; I saw a unit that was choking. The ‘Sales Tech’ hadn’t even popped the front cover. I pulled the filters—they were matted with pet hair and dust, thick as a wool blanket. Because the airflow was restricted, the evaporator coil temperature had plummeted below the freezing point, turning the unit into a block of ice. When it cycled off, that ice melted faster than the shallow condensate pan could handle. I cleaned the filters, blew out the drain line with a shot of nitrogen, and charged her $150 for a service call. She didn’t need a new system; she needed a technician who gave a damn about thermodynamics. This is the reality of the trade: 90% of the problems I see aren’t mechanical failures; they are maintenance failures. To understand why your unit is leaking, you have to understand the ‘Thermodynamic Zooming’ of a mini-split. Inside that indoor head is an evaporator coil. Its job is to drop the temperature of the air below its dew point. When that happens, the ‘Latent Heat’—the energy held in the humidity—is stripped away, and the water vapor turns into liquid condensate. In a humid climate like Houston or Miami, a single 12,000 BTU head can pull gallons of water out of the air in a day. That water has to go somewhere, and if the path isn’t clear, it’s coming down your wall.
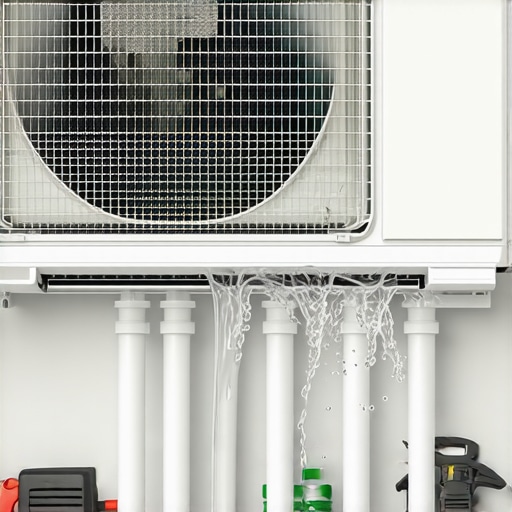
The Mechanical Anatomy: Why Mini-Splits Are Different
In a traditional furnace repair or a standard AC installation, you have a massive primary drain pan and a secondary safety pan with a float switch that kills the system if things get backed up. A mini-split is a different animal. It’s a precision instrument. The drain pan is barely an inch deep, tucked tightly behind the ‘Suction Line’ (which should be ‘beer can cold’ if the ‘Juice’—the refrigerant—is at the right level). Because these units are often mounted on interior walls, they rely on a 5/8-inch plastic tube to carry that water outside. There is no room for error. If the ‘Sparky’ (electrician) or the ‘Tin Knocker’ (duct guy) didn’t level the unit perfectly, or if a single clump of algae forms in that line, gravity loses the battle. The water backs up, surface tension breaks, and your wall gets a bath.
Fix #1: The Gravity-Defying Suck-Out (The Shop-Vac Method)
If your unit is leaking, the first place to look is the exit strategy. Go outside and find where the 3/4-inch PVC or vinyl tubing exits the ‘Line Hide’ (the plastic channel covering the pipes). In the humid South, these lines become breeding grounds for ‘Zoogleal mats’—a fancy word for that snot-like algae that thrives in cool, dark, wet pipes. Don’t try to blow into the line; you’ll just push the clog back into the narrow pan and make a bigger mess. Instead, take a wet/dry Shop-Vac. Wrap a damp rag around the vacuum hose and the drain line to create a seal. Turn it on and let it rip for about thirty seconds. You’ll likely see a disgusting ‘slug’ of gray slime fly into the vacuum. This is the most common cause of mini-split leaks in 2026. If the water starts flowing freely, you’ve just saved yourself a $300 service call. It’s simple physics: you’re restoring the atmospheric pressure balance and removing the physical obstruction.
Fix #2: The Biofilm Flush (Chemical Warfare)
Once the line is clear, you need to prevent the slime from coming back. I’ve seen guys use ‘Pookie’ (mastic) to seal things that shouldn’t be sealed, but when it comes to the drain pan, you need chemistry. Pop the front cover of your mini-split. You’ll see the delicate aluminum fins of the evaporator coil. Do not touch them; they bend if you look at them wrong. Look at the very bottom where the fins meet the plastic. That’s your drain trough. Take a mixture of 10% bleach and 90% warm water, or a specialized EPA-approved pan treatment. Slowly—slowly—pour it into the pan. If you see it exit the house outside, you’re golden. This kills the microscopic spores that turn into those Zoogleal mats.
“Section 608 of the Clean Air Act focuses on the refrigerant, but the longevity of the system relies on the management of the condensate bypass.” – EPA Guidelines (Paraphrased for Techs)
Fix #3: The Leveling Correction (The Mechanical Re-Alignment)
Sometimes, the leak isn’t a clog; it’s a geometry problem. Houses settle. A mini-split head that was perfectly level three years ago might now be leaning 1/8th of an inch to the left. Because the drain port is on one specific side of the pan, a slight tilt in the wrong direction creates a ‘dead zone’ where water pools, builds up surface tension, and eventually overflows the back of the unit. Put a small torpedo level on the top of the indoor head. If it’s leaning away from the drain side, you’ve found your culprit. Most mounting brackets have a little bit of play. You can often gently—GENTLY—lift the bottom of the unit and place a small plastic shim behind the bracket to restore the pitch. If you’re uncomfortable doing this, that’s when you call for a professional heating service or AC technician, but at least you can tell them exactly what the problem is so they don’t try to sell you a new compressor.
The Math of Repair vs. Replace in 2026
We are in a new era of HVAC. With the transition to A2L refrigerants like R-454B, the cost of ‘Gas’ or ‘Juice’ has skyrocketed. A simple leak repair that used to cost $400 might now run you $1,200 because of the new sensors and safety protocols required for ‘mildly flammable’ refrigerants. This is why DIY maintenance on the ‘low-stakes’ parts of the system—like the drain line—is so critical. A leaking drain isn’t just a nuisance; if left unchecked, the moisture can get into the ‘Sparky’s’ wiring or the control board, frying the ‘brains’ of the unit. A $20 Shop-Vac fix prevents a $2,000 board replacement. Don’t let a ‘Sales Tech’ convince you that a leak means the unit is ‘shot.’ If the air coming out of the vents is still 15-20 degrees colder than the air going in, your refrigerant circuit is fine. The machine is doing its job of ‘Sensible Heat’ removal; it’s just failing at the ‘Latent Heat’ disposal. Respect the airflow, clear the slime, and keep your money in your pocket.